
How to Set Up the Free 2025 Facebook Messenger Chatbot on Squarespace
Want to build customer engagement on your website? Live chat boxes are the perfect solution; since they facilitate real-time interactions, visitors are better equipped to make informed purchase decisions quickly.
Numerous third-party plugins are available for this, but we recommend Facebook Messenger. The best part is that it’s completely free of charge and super easy to set up on your Squarespace! Also, suppose you’re already using Facebook for your business. In that case, it brings you a quick way to interact with customers immediately without adding another platform into the mix.
Before we get started, ensure that you have a Facebook Business account. If you don’t have one, you can sign up here. Adding a chatbox to Squarespace: Adding a chatbox to Squarespace can be done through alternative means if Facebook isn't your jam, but it may charge a monthly fee.
Additionally, this requires the Squarespace Business plan as we are going to be copying and pasting some code from Facebook into your Squarespace site (don’t panic, it’s easy-peasy) – this level of functionality requires Business or higher.
Facebook has recently updated how it allows you to access this chat feature, so we've provided the best instructions we could find in November 2022.
Configuring the Facebook Messenger Chatbot on Your Website

Let's first set up the Messenger feature on Facebook to generate the custom code for Squarespace.
Begin by ensuring you're logged into your business's Facebook page. Access your Facebook Page's Meta Business Suite Inbox directly with this link. Here, you can conveniently manage all Facebook and Instagram comments and DMs.
Within the Meta Business Suite Inbox window, click the Gear icon at the top right.
Navigate to the View all settings option in the Inbox Modes drop-down menu.
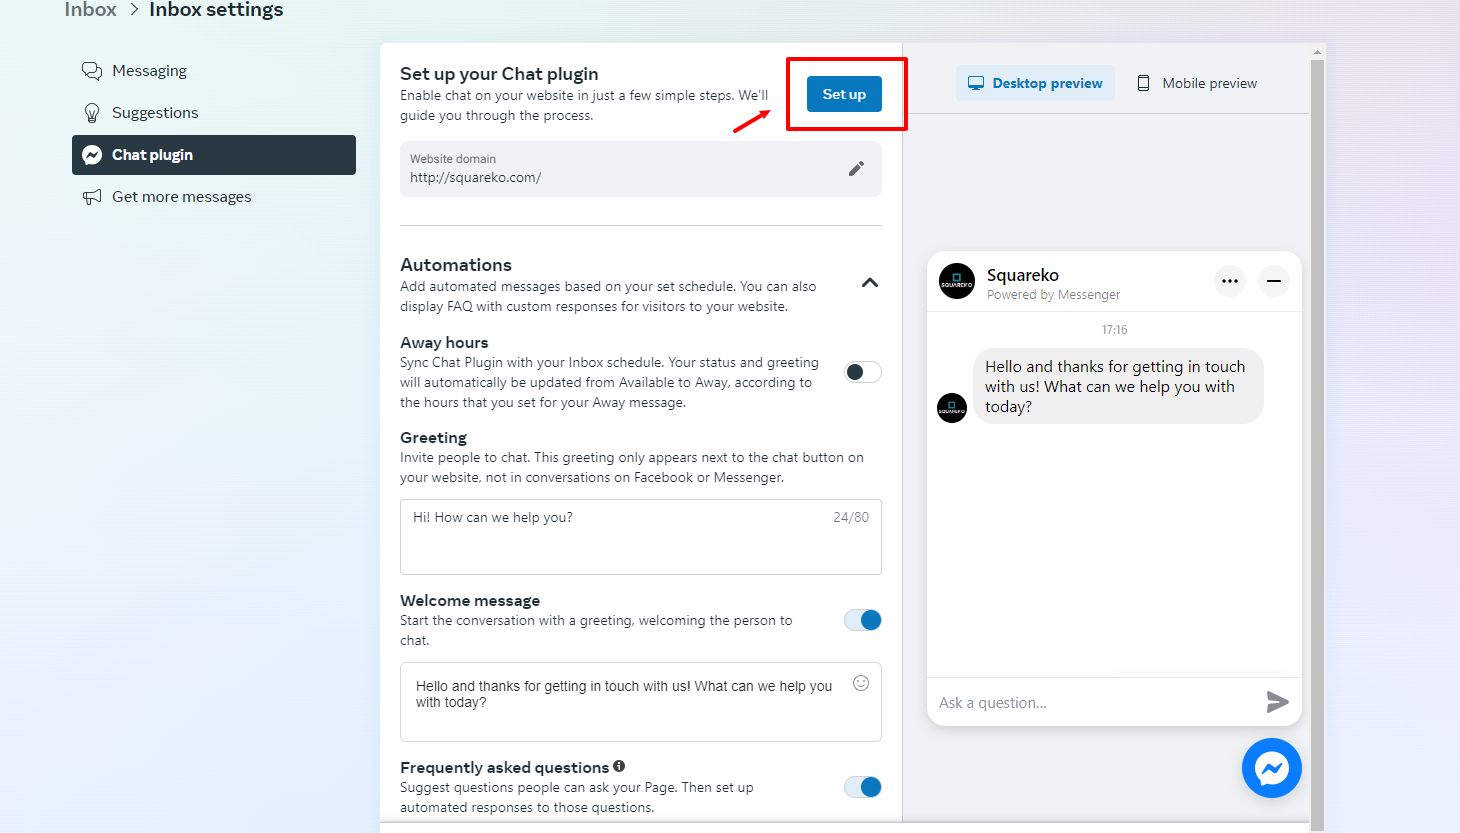
Proceed by clicking Chat Plugin from the left-hand navigation menu.

Now, let’s establish the Website domain, also previously recognized as whitelisted domains. Input the domain of the website where you want the Facebook Chat Plugin to be visible.
Click the edit icon to modify the Website domain settings.

A pop-up window will appear where you can enter the full website domain for the Chat Plugin's display. Save your changes once completed.
For additional functionality, consider adding your Squarespace-built domain. This allows the chat plugin to be visible in both live mode and site editing mode. You can find your Squarespace-built domain by logging into your Squarespace site and copying the domain from the address bar (excluding anything following ".com/"). Alternatively, locate this in Squarespace under Settings > Domains.
Now, it's time to personalize the Facebook Chat Plugin!
Configuring Chatbox Automation
Now, let's dive into setting up automation for your chatbox. Automations are predefined messages that your website visitors will encounter when they engage with your chatbox.
To get started, click the arrow icon next to the 'Automation' section, unveiling a range of options.
Away Hours: Synchronize your chatbox with your working hours. If you have specific hours of operation, the chatbox will notify visitors when you're unavailable outside of those hours. You can enable or disable this feature as needed.
Greeting: Craft a personalized message to welcome visitors to your site as they initiate a conversation.
Welcome Message: Establish a custom message to kickstart the conversation with your website visitors.
Frequently Asked Questions (FAQs): Implement a set of frequently asked questions to enable automated responses, reducing the need for constant manual management."
Let me know if you'd like any further adjustments or if you have more content to rephrase.
Adjust Your Chat Plugin Settings
Now, it's time to have some fun with the appearance of your Chat Plugin!
Click on the arrow next to the "Customize your Chat Plugin" section to reveal the customization options.
You'll find several ways to make your chat plugin match your website's branding. While making changes, you can see real-time previews in both desktop and mobile formats using the sample plugin on the right-hand side.
Let's explore the customization options for your Facebook Chat Plugin:
Guest Chat:
Enable or disable this option to allow people to chat with your business, even if they're not logged into Facebook.
How to add a chatbox to your Squarespace site for free - guest chat
Preset :
Adjust the chatbox plugin's color to match your website using hex color codes.
chatbox color:

Chat Button: Choose the display and style options for the Chat Plugin button.
chat button:

Prominence: Decide how you want the chatbox to appear to visitors, whether as a small icon or with a welcome message to start conversations.
chat box prominence:
Chat Button Size: Select the button size for both desktop and mobile.
Chat button size:
Chat Window Size: Pick between the Standard or Compact chat window size.
Chat window size:
Play with alignment and margin values to control the chat box's placement on your website.
Chatbox position:
Once you're satisfied with the look and feel of your chatbox, click "Publish."
Copy Your Chat Plugin Code
We're on the verge of adding the chatbox to your Squarespace site, but there's one last step: grabbing the code from Facebook.
Click the blue "Set Up" button located at the top of the Chat Plugin section on Facebook.
A pop-up window will appear, prompting you to select a setup method. For Squarespace sites, choose "Squarespace."

From the drop-down menu, select the default language for your chatbox. Then, click "Save & Continue."
Re-enter the domains you previously set up in the Advanced Messaging section if they don't appear automatically. Begin by entering the domain for the website where you want the chat plugin to appear. You can also add your built-in Squarespace domain as an option. This will enable the chat plugin to function both on the live website and within the Squarespace editing interface.
If the domains are automatically detected and accurate, click "Save & Continue."

Facebook has now generated custom code that you'll need to add to your Squarespace website. Copy this code and click "Next." All that's left is to paste this code directly into your website. Click "Finish" and then "Done," and let's move on to Squarespace to integrate the Facebook Chat Plugin code into your site!

Insert the Facebook Chat Plugin Code

Access your website settings and navigate to Settings > Advanced > Code Injection.
Paste the code provided by Facebook into the Footer section and click Save. The chatbox plugin should become visible, but you might need to refresh the page to activate it.
Now, you're all set to engage with your website visitors using Facebook Messenger!
FAQ
1. Can I integrate the Facebook Messenger chatbox into my Squarespace for free?
Yes! However, you can embed the Facebook Messenger chatbox on your Squarespace website without paying any fee using Facebook’s free Chat Plugin.
2. Does the Messenger chat box require code to implement it?
No, you will not require any coding experience. All you have to do is copy and paste the Messenger chat plugin code to the Code Injection section on your Squarespace website.
3. Is the chatbox compatible with my site on both desktop and mobile versions?
Yes, the Chat Plugin for Facebook Messenger is 100% responsive, which means it will look and work perfectly well on desktop and mobile devices.
4. Can I customize the Messenger chatbox to match my website’s design?
Yes! You can customize the theme color, greeting message, and language settings to align with your Squarespace site’s branding..
How do I deal with the messages I receive via the Messenger chatbox on my website?
The messages sent in the chatbox will show up in your Facebook Page Inbox, as well as in the Meta Business Suite, where you can respond in real time.